
Two things to check with the pillowcases...
1. NO Micro Fiber
2. Put your hand under the fabric... if you can see the outline or an image of your hand then the pillowcase is too light
Now that you have chosen your pillowcase please choose some items to contrast with it...

Here are my choices for this dress
Perhaps rick rack is too expensive because you were unable to find it at a thrift store or an estate sale

How about ribbon and some contrasting fabric for the pocket?

Or maybe choose a contrasting fabric and make a band to put near the bottom and also make a pocket out of it. When making the band be sure and turn the edges under 1/4" and press. Please do not make pockets or bands without finishing the edge. They will just fray especially when washed in a river!
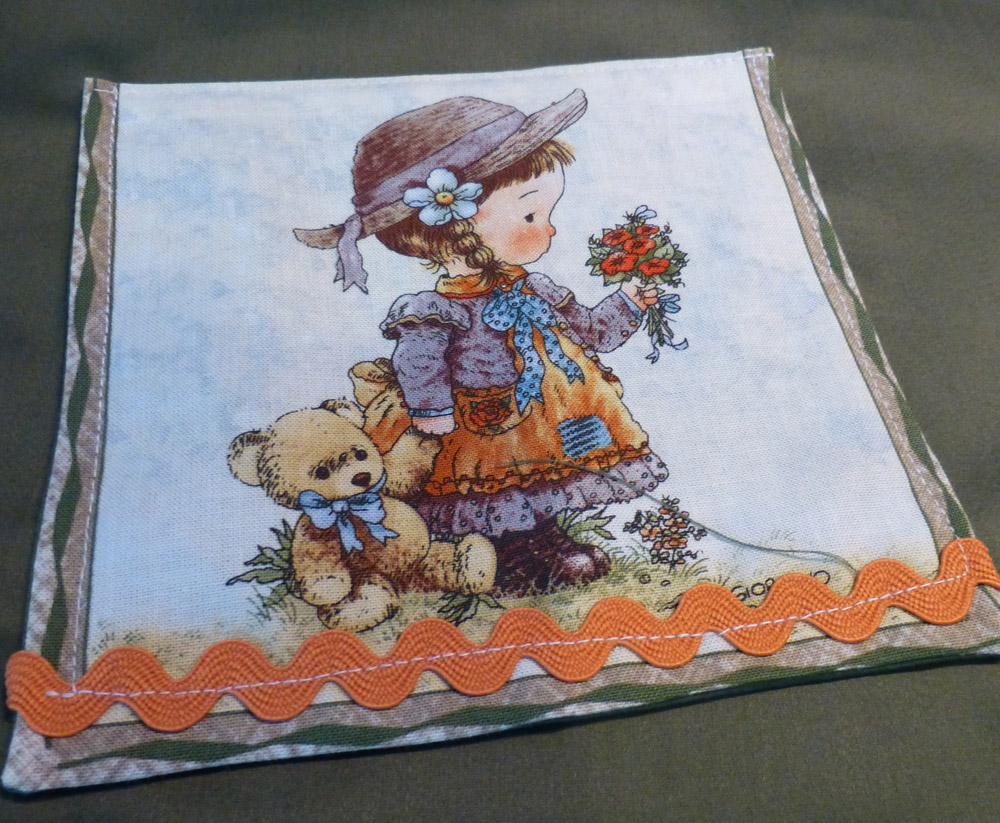
I chose to put rick rack over the hem stitching near the bottom of the pillowcase

Now measure the width of you pillowcase... this will determine the size of your dress using the chart that I can send you suzannesewdelightful@gmail.com
Before you cut the length decide if you are going to make a regular casing or the Ruffled Casing.
I want this dress to have a few simple frills added to it because it is such a plain (although very good) pillowcase. The first thing I decide to do is add a ruffle at the top of the dress... at the casing. Because I am making the Ruffled Casing I will need to add 1" to the length of my dress... when looking at the chart... Now cut off the top of the pillowcase to the desired length

My pillowcase had to be cut in length because it was too narrow for a larger sized dress
I will be making a size 6 dress
Once you have cut the length you need to cut the armhole. Using the template cut the armhole 1" longer than the template because we are making the Ruffled Casing

Now press under the top of the dress 1/4" front and back
Usually you would now press the casing a little more than 1" but because I am making a Ruffled Casing. I am going to press the casing about 1 1/2"

Stitch the casing at the bottom edge.
Go back and stitch a second row closer to the top

I use my sewing foot to help me determine where to stitch. I put my needle in the left position and run the right edge of the sewing foot along the edge of the fabric. This gives me a row of stitching just about 1/2" from the top of the dress.
I now have two rows of stitching

I will put the elastic in the lower casing... it is also the wider casing
Now please do this final step for all solid colored pillowcases. Add a pocket. A pocket makes these dresses so cute and it also gives a little girl her own special place to keep her treasures.
Please follow this link for a tutorial on making pockets
You can sew it on straight or at a bit of an angle.
Finding the right placement on the dress can be a little tricky
I put the pocket on before I add the elastic to the casing but after I have sewn the casing...
that way I can see how long the dress really is but it will still lie flat and it is easier to add the pocket.
I usually place my pockets on the right because most people are right handed
I place the middle of the pocket just slightly lower than half way from the top to the bottom of the dress.
Now you need your elastic... 1" longer for the back than for the front casing and your bias tape

Feed the elastic through the casing and sew at each end to secure it until you sew on the bias tape
Sew close enough to the edge that once you put the bias tape on and sew it will cover this stitching
For more details on this step please see the high waisted dress tutorial
the steps for elastic and bias are the same for any dress.
Sew how did my dress turn out... I added a yoyo and here it is

If you need any help email me at
No comments:
Post a Comment